Choosing a taxidermist before the hunt
Your trophy is of great pride and brings back memories of your hunt. It is also costly and therefore it pays by choosing a taxidermist of superior quality.
There would be very unpleasant consequences if your trophy ended up in the hands of an inexperienced taxidermist who cannot be held liable for incorrect treatment of your trophy. If you choose the wrong taxidermist before the hunt, pay for the mount and then get trophies that are destroyed or poorly made, there is usually nothing you can do about it.
However, with First Class Trophy you can rest assured that you have chosen quality and safety, guaranteed. With us, you get Danish handling of the highest quality and 100% accountability. We welcome you to visit our showrooms, where you can both see and feel the quality of our work.
When you select us as your taxidermist, we take it as an expression of trust in us. This trust we will live up to – always.
360 degree personalized service package around the trophy.
First Class Trophy is the modern taxidermy company version 4.0.
We base our customer service on a wide range of modern technologies, that takes us apart from the “old fashioned” taxidermy workshop.
We recognize that today´s trophy hunter demands more than just high craftsmanship and high physical product quality. Today, a modern taxidermy company must also deliver a 360 degree personalized service package around the trophy. This service package must be supported by effective IT-systems, modern and appropriate production facilities and technologies, efficient and accurate logistic solution to support and help the hunter with the trophy all over the world, fast and precise communication with the client, customer online access to web-based production portal, reasonable delivery / turn-around times and value-for-money pricing.
1 contact saves time, disappointments and money.
For many of our customers, we manage and coordinate the entire “battle” process of repatriation of trophies from all over the world and delivery to the door of the finished trophy mounts. The hunter has only 1 contact and it’s First Class Trophy. It saves time, disappointments and money.
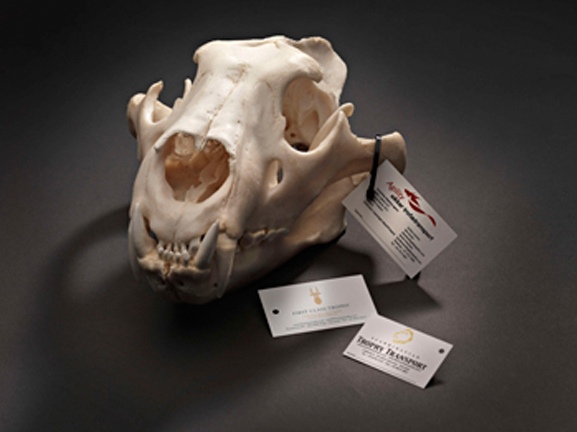
Trophy tags
As a service to our customers we offer our trophy tags. These are made of a special PVC material resistant to acids. They also tolerate salt, strong sunlight, heat, cold, etc. The tags can be written on with a waterproof marker. Please send an email or give us a call and we will send the number of trophy tags you require. This service is free of charge. Please make sure that you order enough tags before the hunt for horns, skull, skin and possibly back skins.
Routing Order
Prior to departure on your hunt, we recommend that you contact an experienced freight forwarder specializing in trophy handling. We will be pleased to help you with this if you prefer us to handle this also.
Bring this Routing Order with you on your hunting trip and give it to your outfitter or PH, where all the instructions on the repatriation of your trophies will be carried out.
The Routing Order will be prepared with a number of copies. You keep one and your outfitter or PH keeps the others to present to the local taxidermist, who, in cooperation with a freight forwarder, provides for ‘Dip & Pack’ and the handling of your trophies
Treating Your Trophy
It is important that you know what to do in the field when you have successfully taken down your trophy. Correct treatment in the field is essential. Inexperienced field treatment could result in a skin that is not usable due to bad cutting or damage in some other way. The skin could also decay or be destroyed by insects if not properly treated in the field.
Unless you have experience in this, we recommend that you let your hunting organizer or outfitter carry out this work as they have a lot of experience.
You need to consider how you want your trophy mounted. If you are not completely sure what type of mount you would like, we recommend that you ask for the whole skin in case you decide on a full mount. You are then free to make a decision at a later stage.
Bird Preparation
When in the field, correct bird preparation is important to ensure a high quality trophy. If possible pick up the bird yourself. Do not send the dog.
Lift up the bird up by its feet to avoid pulling out any feathers by accident. Avoid carrying the bird in your bird bag and rather hold it in your hands or carry it by its feet.
Take a clean cloth and some water and remove any blood and dirt. Do not remove the bird’s stomach. Leave the bird complete. If you must hang the bird, do so by its feet and not around the neck. Pay extra attention not to pull out or break any feathers. Also pay extra attention to the feathers on the head.
Let the bird cool down in the shade until cold and then place it in an airtight plastic bag. Freeze the bird as soon as possible. To protect the tail and head feathers it is advised to line the bag with a piece of stiff paper before you freeze the bird. Make sure the plastic bag is airtight to avoid the bird drying out.
If you want to send your bird to First Class Trophy, it must be packed in material that will keep the bird frozen for as long as possible. Layers of newspaper work well. Wrap the bird in a stiff box to protect against bumps and bruises during transport.
Field Preparation For Full Mount
First, cut on the back of the front legs until you reach the ‘armpit’ at the middle of the chest.
On the hind legs, follow the natural hairline on the back of the legs. Your cut must continue all the way to the area in front of the anal opening. Now cut the skin down the middle of the stomach (cut along the one side of the testicals, leaving all the ‘the private parts’ on the skin.) Hooves can stay on the bones, but the foot bone must be cut off at the hoof.
From a point approximately 5cm behind the horns, cut the skin on top of the neck of the animal, making sure you make this cut just big enough to pull the head through the opening.
From the point where you started cutting from the horns, cut in a ‘y’ shape until you reach the base of the horns. Carefully cut the ears off the skull and then gently loosen the skin around the base of the horns. Cut the skin off until you reach the eyes. Be extra careful with the eyes and eye lids. Place a finger in the eye hole while cutting as this gives you a good idea of where to cut.
Be careful with the tear channels that are found on some species as they can be fastened into the skull and must be removed carefully.
When the skin is completely off the eyes, take the skin off the rest of the skull.
Cut the nose almost all the way through and remove the cartilage so that the salt can penetrate.
Your skull is now ready to be cleaned, boiled and bleached.
Now to the very important and often neglected part of full mount preparation – skinning the ears.
Many trophy hunters have received their trophies with the ears, noses or eyelids rotten. This is because the skinning was done incorrectly and the salt did not penetrate properly. The easiest way to do it is to turn the ears inside out by using a blunt stick, a teaspoon or similar. No sharp tools must be used.
When the skin is completely loosened all the way to the tip of the ear, the ear can be turned inside out to ensure that the salt penetrates properly. Remember that salt only penetrates approximately 5mm into the skin. This job is very important and time consuming but it is essential to ensure that your trophies are handled correctly.
The next step is to cut the skin free from the mouth. Put a finger into the mouth and pull the lip away while you are cutting.
Cut almost through the cartilage that forms the nose, to ensure that the salt will penetrate.
Now your trophy is ready to be frozen. Roll it up and put it in a bag. Remember to put trophy tags on your trophies. Do not apply salt if you are going to freeze the trophy, as salt lowers the freezing temperature.
If you do not want to freeze your trophy, it is now time to salt and dry it.
First split the lips by cutting them open from the inside to ensure good salt penetration. Remember that salt only penetrates approximately 5mm so this job must be done carefully.
Place the skin with the meat side up. Remove all meat and fat and clean the skin carefully. If the skin is thick you can make a few cuts on the meat side, to ensure better salt penetration. Take your time and make sure that the salt is rubbed into the skin all over – especially ears, nose, eye lids and around bullet or arrow holes. It is important to make sure you give it enough fresh salt. You can easily use up to 5kg on one skin.
In full mount preparation, ever place the skin in direct sunlight or in a plastic bag. Leave the skin in the salt for 24 hours, to remove all moisture. Change the salt (this is where many people fail). Leave the skin in the new salt until almost completely dry. When dry, remove the skin from the salt and give it a good coating of insecticide. Pay attention that the powder gets into all the small places, especially ears, eye lids and nose.
After approximately 14 days, depending on the weather, your trophy will be ready to be sent to your taxidermist. Remember to put trophy tags on all parts of your trophies – horns, skulls, skins etc. You can get trophy tags, free of charge, from First Class Trophy.
Contact us for further information: office@firstclasstrophy.com
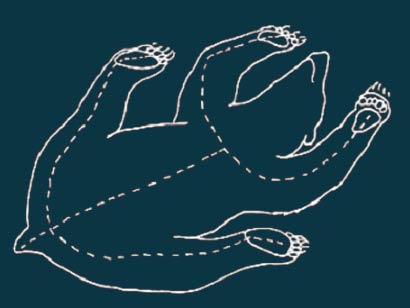
Field Preparation of Rug Mount
These are the instructions to use for bears, big cats etc. The same procedure can be used on zebra flat skin.
Cut the inside of the legs to the middle of the chest and stomach. Make sure you cut down the middle of the stomach to ensure that the finished skin is symmetrical. Cut from the middle of the stomach to the top of the throat, ending at the end of the lower jaw. Pull and press as much of the skin as possible. Only use a blunt knife if absolutely necessary.
Use a knife to clean the skin from meat and fat. Bears have a large amount of fat, and it is advised to skin carefully and get the fat off the skin. Remove bones, claws and hooves paying particular attention to the small foot bones in the last part of the paws of a bear. If you do not remove the small foot bones, the claws will fall off the skin during the tanning process.
Cut the skin from the skull. Cut the ears off close to the skull and continue forwards. Be careful that you do not cut all the way through the eyelids. Placing a finger in the eye hole will give you a good idea of the cutting.
Remove the skin carefully from the eyes and the rest of the skull. Cut almost through the nose and lips to secure good penetration of the salt.
Your trophy is now ready for final cleaning.
Now, a very important part of the field preparation – the ears. Many trophy hunters have received trophies where the ears are rotten because of bad skinning and salting. Ears, nose, eye lids and lips must be skinned and salted correctly. Ears must be turned inside out by using a blunt stick or similar.
The next step is to cut the skin free from the mouth. Put a finger in the mouth and pull away the jaw while cutting. Cut the cartilage almost through, to ensure salt penetration.
Now your skin is ready to be frozen. Roll it up and put it in a bag. Remember to put your trophy tags on the skin. Do not apply salt if you are going to freeze your trophy as salt lowers the freezing temperature. If you do not want to freeze your skin it is now time to salt and dry it.
First split the lips, cutting them open from the inside, to ensure salt penetration. Remember that salt only penetrates approximately 5mm into the skin.
Place the skin meat side up. Remove all meat and fat. Rub the skin thoroughly with new salt. If the skin is very thick, you can slice it on the meat side, for better salt penetration. Be extra careful to rub the salt into ears, lips, eye lids and nose. Bullet holes also need extra salt. Be sure to use new salt. You can easily use 3kg of salt.
In rug mount preparation never place the skin in the sun, and never in a plastic bag. Leave it in the salt for approximately 24 hours. Replace the salt. Many people fail to do this – do not be one of them. Leave the skin in the new salt until almost completely dry. Take the skin out of the salt and give it a good coating of insecticide. Pay extra attention to ears, nose, eye lids etc.
After approximately 14 days, depending on the weather, your trophy will be ready to be sent to your taxidermist. Remember to put trophy tags on all parts of your trophy – horns, skull, skins etc. You can get trophy tags, free of charge, from First Class Trophy.
Contact us on office@firstclasstrophy.com
Field Preparation for Shoulder Mount
Make the first cut all the way around the animal, in a circle, behind the front legs. Make sure you have enough skin for the taxidermist to work with. It is better to cut too far back, than to cut the skin too far forward. Remember that skins for shoulder mounts must NEVER be cut in front or at the throat.
If possible, keep the trophy frozen and let us take the skin from the skull.
Next, loosen the skin all the way around the neck and pull and roll the skin all the way to the neck. Then cut the head from the neck. Put the head in your freezer and bring it to us, or send it to us. It is very important to always call us and get an order number and packing instructions before you send anything to us.
If it is not possible to keep the trophy frozen, or the trophy is too big for your freezer, the head skin must come off the skull. Start at the bottom and slowly cut towards the ears. Stop cutting when you reach the point between the ears.
From that point you cut in a ‘y’ shape until you reach the base of the horns. Cut the ears free from the skull. Loosen the skin around the horns. Cut the skin off until you get to the eyes. Be very careful not to damage the eyelids. Place one finger in the eye of the animal while cutting. This will make sure that you cut gently and it gives you a good indication of where to cut.
Be careful not to cut the tear channel that is found on some animals. It may be fastened into the skull itself and needs to be removed. Loosen it carefully with the tip of your knife.
When the skin has been carefully removed from the eyes, cut the rest of the skin off the skull.
Be careful not to cut through the nose. Make a cut inside the nose to remove all cartilage.
Now the skull is ready to be cleaned, boiled and bleached.
Now to the most important part of skinning – the ears.
Quite a lot of trophy hunters have received their trophies with the ears rotten as a result of bad skinning. Ears are very important and they need to be turned inside out so that the salt can penetrate.
The easiest way is to turn and twist the ears inside out with a blunt stick or a blunt screwdriver. This can take some time, but must be done correctly with NO shortcuts.
The next step is to cut the skin free from the mouth. Put your finger in the side of the mouth and pull the jaw away, while you cut close to the skull.
Cut through the cartilage that forms the nose, to make space for the salt to penetrate.
Now your trophy is ready to be frozen. Roll it up and put it in a bag. Seal it and mark the trophy with trophy tags. Do not apply salt if you are freezing the trophy as salt will lower the freezing temperature. If you are not freezing your trophy, now is the time to salt it and dry it.
First you split the lips by cutting them from the inside to ensure that the salt will penetrate all the way through. Remember that the salt will only penetrate approximately 5mm. This job is very important and time consuming so take your time and get it done correctly. Remember that the trophy must last forever, so the field preparation is of the utmost importance.
Next, place the skin with the meat side up. Remove all meat and fat from the skin. Rub salt thoroughly into the skin, ears and nose parts. If the skin is vey thick you can slice it a bit on the meat side to ensure better salt penetration. Pay carefully attention to the salt on the ears, nose and mouth parts and the bullet or arrow hole. Dont be shy when applying the salt. A skin for a shoulder mount will easily take 2kg of salt. Always use new salt.
Never place the skin in sunlight and never put it in a plastic bag. Leave the trophy in the salt for 24 hours to make sure that all the moisture is out. After 24 hours, change the salt. This is where many people fail. When the skin is almost dry, give it a good coating of insecticide, paying particular attention to the ears, nose, eyes and lips, as well as any folds in the skin.
If in doubt, contact us for information.
Leave the skin to dry for approximately two weeks, depending on weather conditions. Your trophy is now ready to be sent to your taxidermist. Remember to put trophy tags on all parts of your trophy: horns, skulls, skin for shoulder mount or full mount and back skins. You can get trophy tags for free, from First Class Trophy. Contact head office – office@firstclasstrophy.com

